Looking for an easy-to-understand guide on how to start a blog?
In this article, I will share a step-by-step guide to starting a blog and also tell you the best way to monetize that blog to make money.
This guide is made for beginners who are just starting their blogging career or the person who is planning to start a blog.
I will try to explain everything here in easy-to-understand but if at any point if stuck or want to ask any questions you can ask that in the comment section of this article or you can contact me on Instagram I will try my best to help you out.
Before starting this guide there are some basic things that you need to know about a blog.
What is a blog?
In simple words, a blog is a website where you can write content, and readers will read and interact with you through comments. Also, there are many read-only blogs like news blogs and celebrity blogs where you can just read their content.
The best thing I love about a blog is you can present your views in front of readers from anywhere in the world with just an internet connection and a laptop. Also, you can interact with your readers and understand their psychology, and improve your content with their suggestions.
So in this article, I will share the guide to starting a blog where you can present your content and interact with your readers. I will also tell you how you can make money through your blog.
Why you should start a blog?
There are many reasons to start a blog and every blogger may have their own reasons to start their blog. But here I will tell you the top reason to start a blog and these are reasons that no one denies.
Some of these reasons are what I personally considered when I started my first blog back in 2015. Now let’s discuss all the reasons to start a blog one by one.
- You can share anything you want: You can share what thoughts you have in your mind without any content limit. If you want to share your story you can do that. Ex you want to share a story but don’t want to show your face you can easily do this with a blog.
- Make money from anywhere in the world: Yes it’s right you can make money by writing a blog. there are many ways to make money through a blog that will be discussed in this article later. But if you want to know how much money you can make through a blog then let me tell you bloggers make millions of dollars just through their blogs.
- You will connect with many like-minded people: We all love to talk with like-minded people but it normally limits the place where we live but with the blog, you get an opportunity to connect with like-minded people in the whole world. I personally connect with many people who have big names in the industry and I talk to them and meet them just because of my blogs.
- Get popularity among the public: Once the audience starts liking your content they will share your blog with more people and by this, you will get popularity among the public like any other celebrity.
Now I think this is enough to start a blog So let’s move forward and learn through this step-by-step guide.
Step 1: Decide a blog name
This is the first and really important thing you need to do. To start a blog first you need to choose an appealing blog name that is attractive, tells about your blog topic, is easy to pronounce, and is easy to remember.
These are some important points you should consider while choosing your blog name. There are many bloggers who start their blog with their name but personally, I don’t recommend you to do that because that thing makes more sense to build a personal brand.
If you want to make a business as a blog you should consider the above points while choosing the blog name.
How to choose a blog topic and name
If you are confused about choosing the blog name then let me help you.
First, you need to decide your blog topics Ex. at HostKro’s blog we share content about blogging and marketing. Same as this you need to decide on a topic for your blog.
If you are confused about choosing a blog topic then make a list of your interests, and hobbies and find the topics for your blog from that list.
Also, you are starting a blog on an interest-based topic will help you to your knowledge and also you can’t get bored while writing blog posts.
Once you are done with choosing the blog topic now is time to decide on the blog name or you can say the domain name. Ex. “hostkro.com” where HostKro is the name and “.com” is an extension and combined it is a domain name.
If you have any name in your mind then you can search the extensions available for that name. There are thousands of domain extensions like (.com, .net, .in, .org etc.) But I will suggest you go with the “.com” domain extension.
To search for the domain extension just go to HostKro’s Domain Registration page and enter your desired domain name if the domain is available with the desired extension then it will show you that the domain is available as shown in the below image.
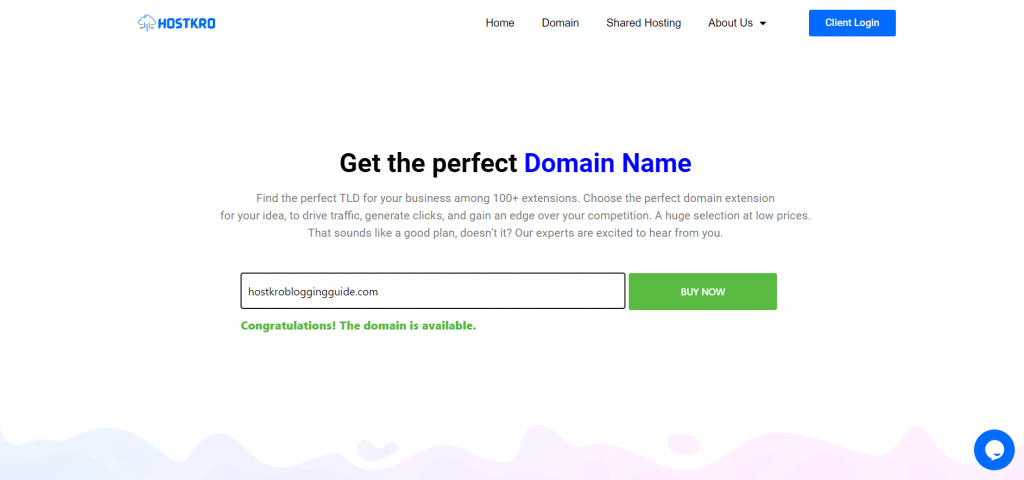
If the domain name is not available with the desired extension then try another name.
Now if you don’t have another name in your mind then you can generate names related to your blog topics by using business name generator tools.
Go to Businessnamegenerator.com and enter your blog topic and it will show you a lot of domain names related to your topic.
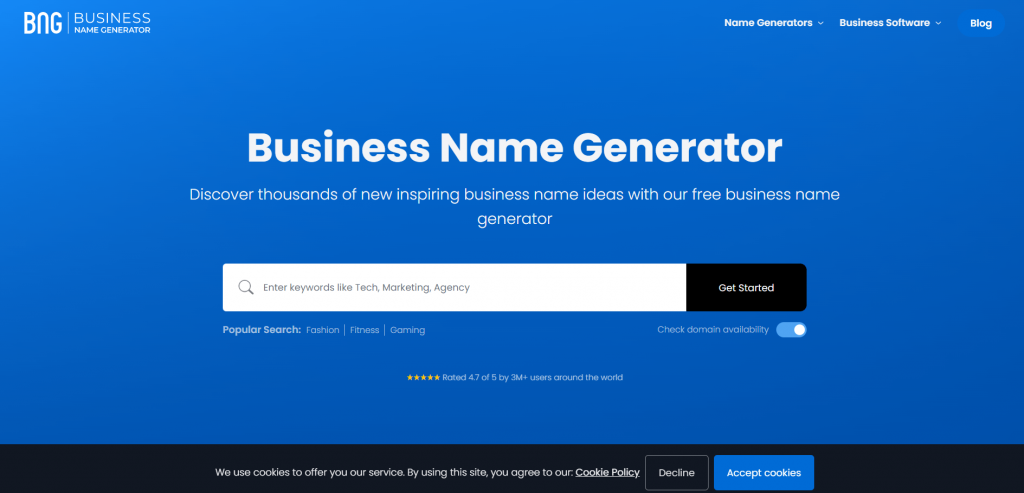
After deciding on the blog topic and the domain name now you need to register that domain to take it online in front of your audience.
Step 2: Get your blog online
To get your blog online you need two things first you need to register your domain name and get hosting to make a blog. Wait confused about domain registration and hosting?
Let me explain it to you.
- What is domain registration? : You need to register your domain name to use that for your blog and once you registered it no one else can use it for this, you need to pay a small registration fee that I will tell you in some time.
- What is hosting? : Hosting is the online server where all your blog’s files will be stored like images, articles, and many more files.
Now you may have a question Where do you need to register the domain name? and How to get hosting for your blog?
HostKro will help you in this. At HostKro you can register your domain name and also get hosting for your blog. So let’s see this step-by-step on how to register a domain name and get hosting.
1. Choose the hosting Plan
At HostKro we have three different hosting plans Starter, Premium, and Business. I suggest you choose the premium plan because in this plan you can add up to 5 domains. To know more about all these HostKro’s hosting plans you can check details on Shared Hosting Page.
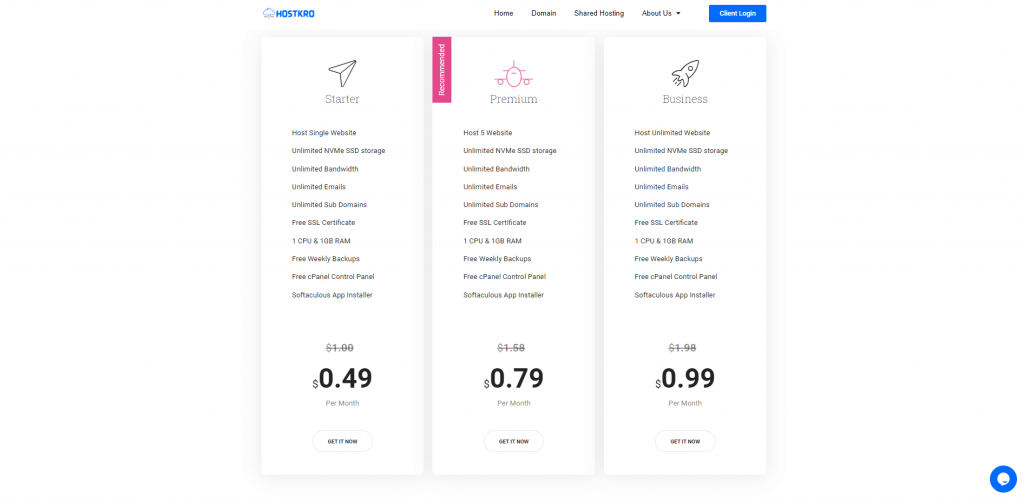
After choosing the hosting plan click on the get it now button.
2. Enter your domain name
On this page enter your domain name and choose the domain extension that you decide on in the first step and click on the check button.
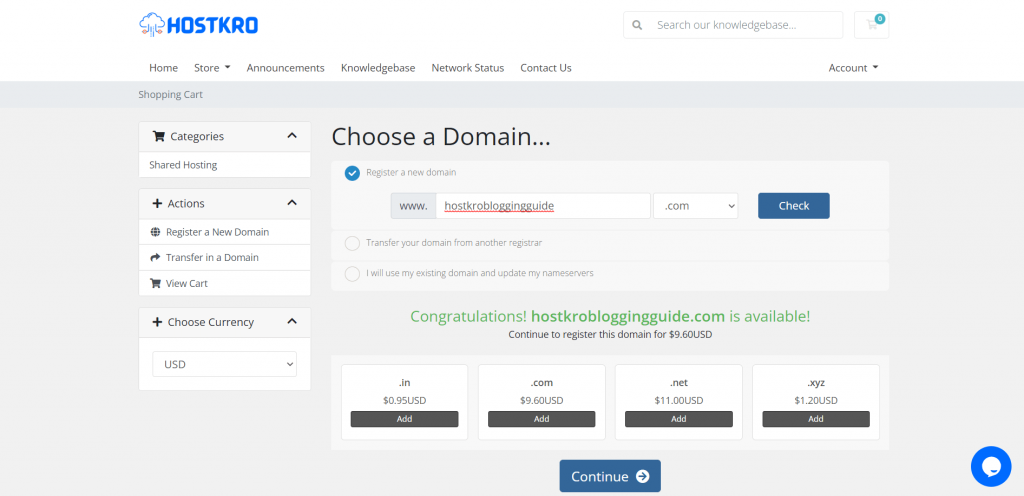
Now it will show you the available domain extension choose that and click on the continue button.
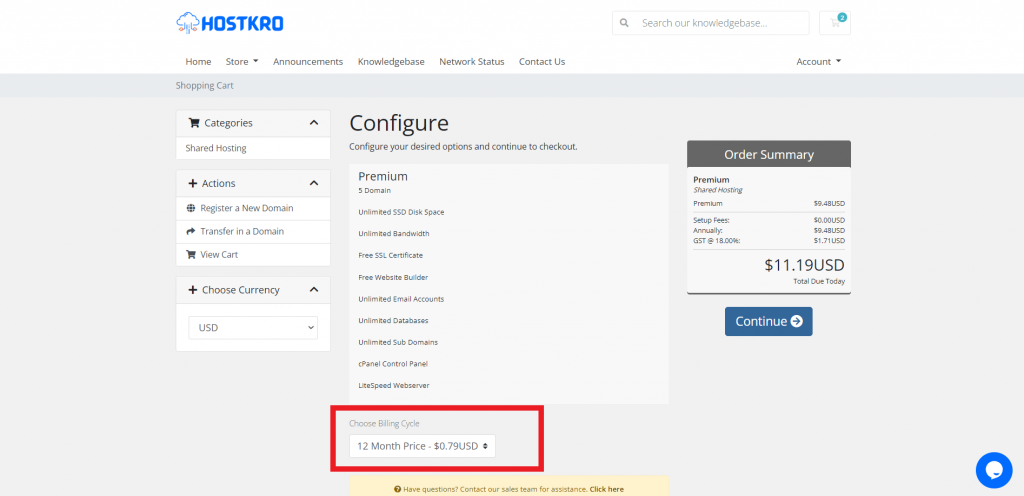
3. Choose the billing cycle
Here choose the billing cycle I will suggest you go with annual billing because on annual billing you will get 50% off.
4. Apply Discount Coupon
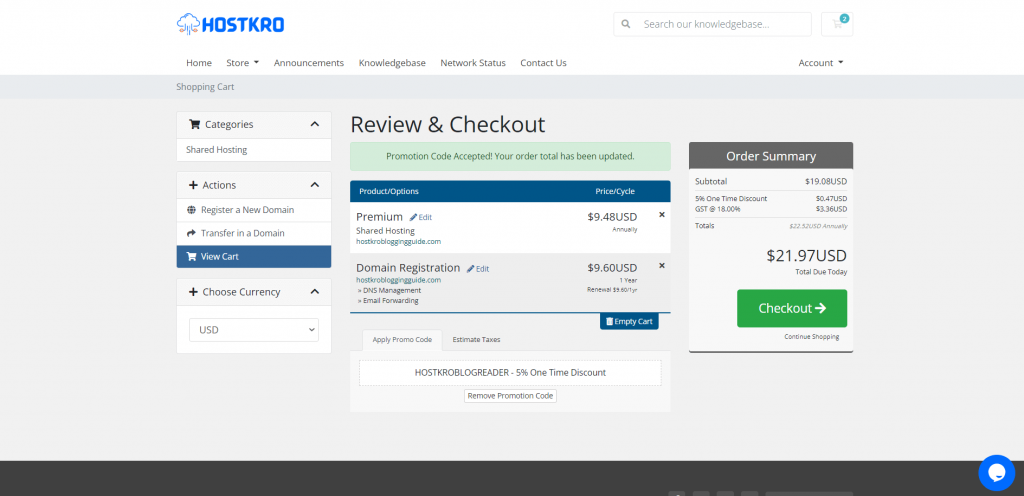
Because you are a reader of HostKro’s blog you will get an extra 5% off on your hosting plan now you will get a total of 55% off on HostKro hosting. To get this extra 5% off use promo code “HOSTKROBLOGREADER“.
5. Create an account on HostKro
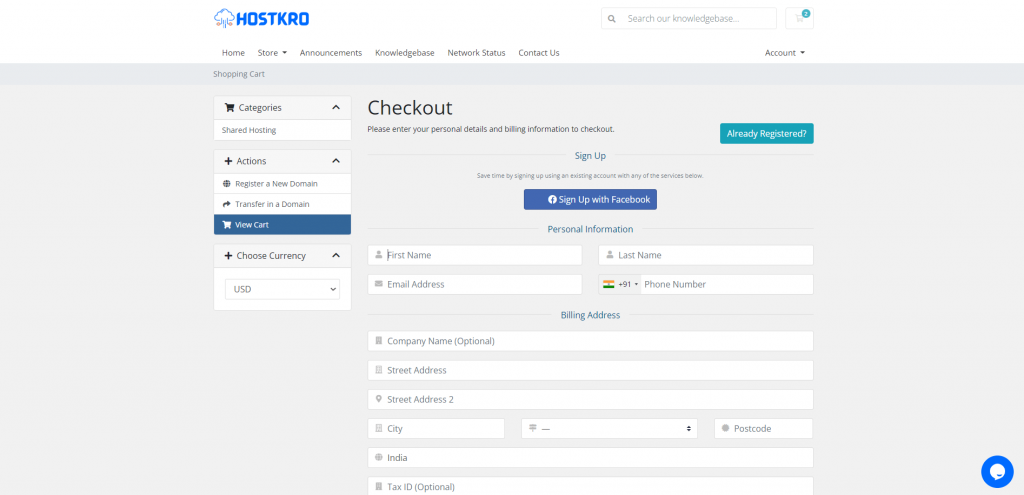
Enter your basic details (ex. Name, Address, Email, Password, etc) to create your account on HostKro.
6. Choose the payment method
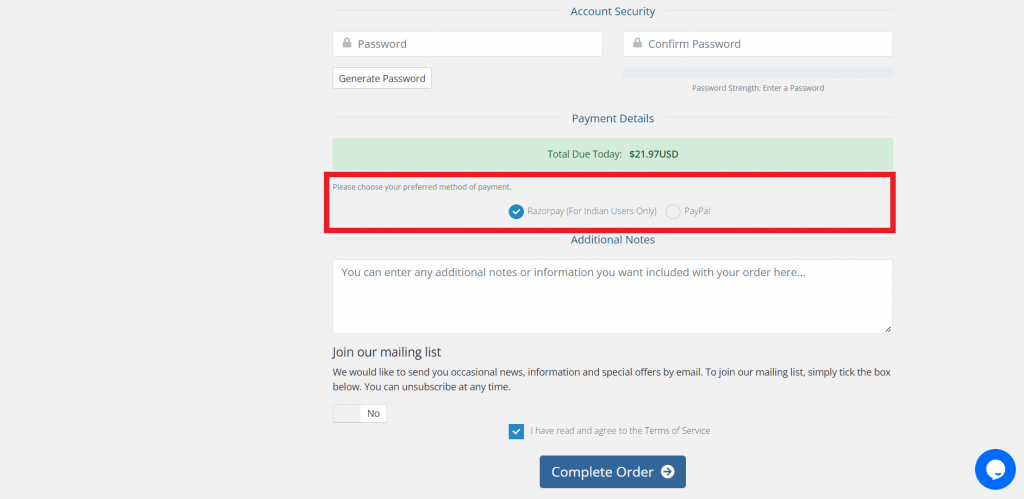
On the same page after entering your details scroll down can choose the payment gateway. Currently, at HostKro there are two payment gateways available (RazorPay and PayPal).
- If you are from India you can pay through UPI, Debit/ Credit card, Wallets, Net Banking, and more.
- If you are from any other country then you can pay through PayPal and by choosing PayPal you can Pay through a Debit/Credit Card, and PayPal wallet balance.
Now, pay through your desired payment method. Boom! you registered your domain and got the hosting for your blog.
7. Install WordPress – Blogging Platform
WordPress is the best platform to start a blog let me tell you one amazing fact about WordPress. 43% of websites in the world use WordPress. Also, every popular blog builds on WordPress.
This is not the only reason to use WordPress as your blogging platform there are many more reasons to choose WordPress instead of other platforms.
- WordPress is easy to use – Even a beginner can use WordPress easily no need for any coding knowledge to make a blog with WordPress.
- You can add any feature to your blog – Adding features which available on other blogs or any feature that you want to add to your blog is very easy you just need to search the WordPress plugin for that feature and you are good to go.
- Easy to design – To design your blog there is no requirement for any type of coding language you get thousands of themes that you can design just by dragging and dropping elements that your need.
These are a few reasons to choose WordPress over other platforms.
Let’s see How to install WordPress.
I already created a complete step by step guide to install WordPress where I show every possible way to install WordPress if you want you can check that out or you can keep reading this article here I will share the easiest way to install WordPress.
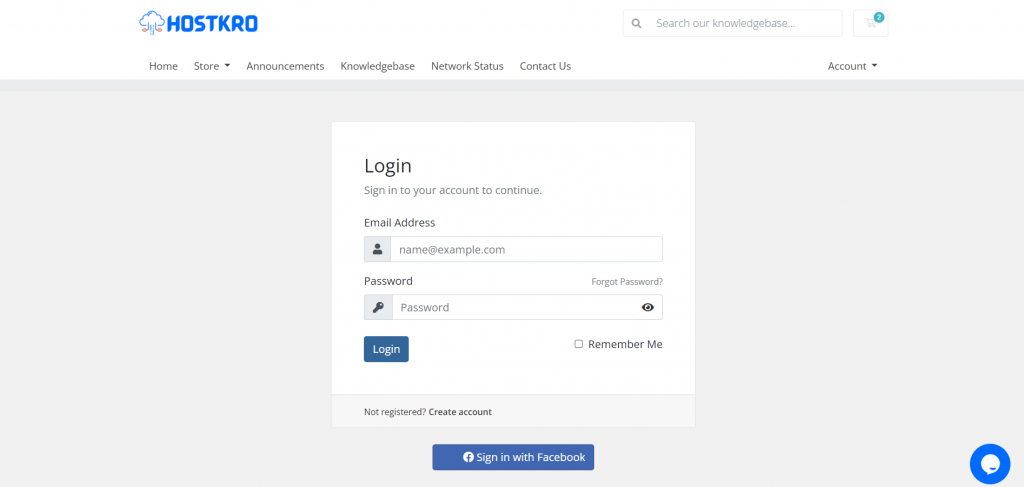
- Login to your HostKro’s account
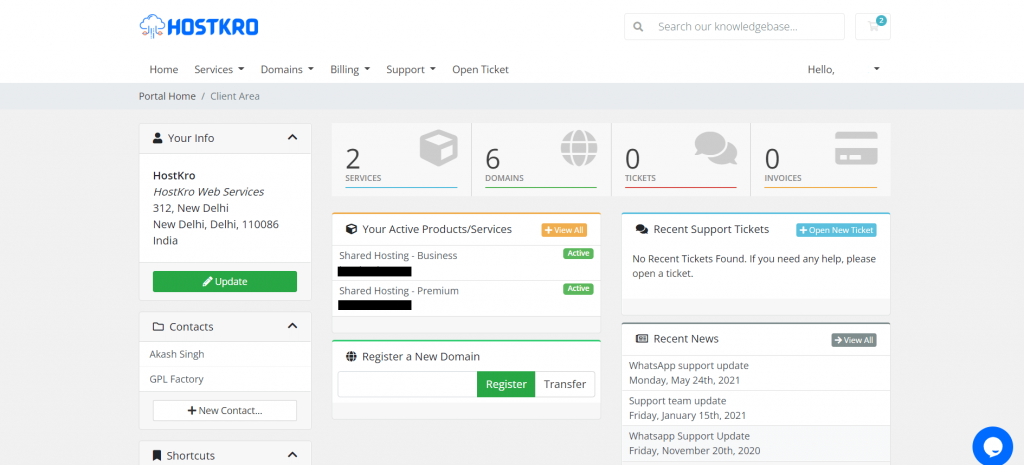
- Now go to the services section
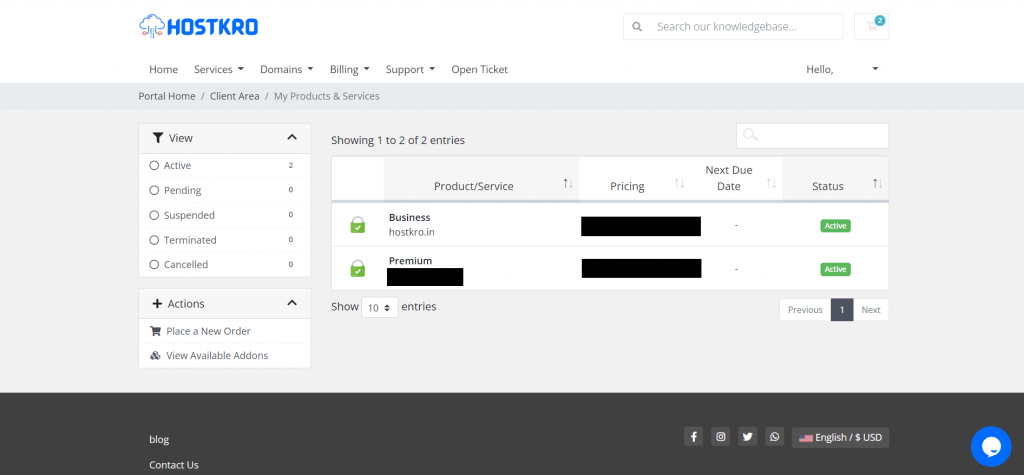
- Here choose the domain on which you want to install WordPress
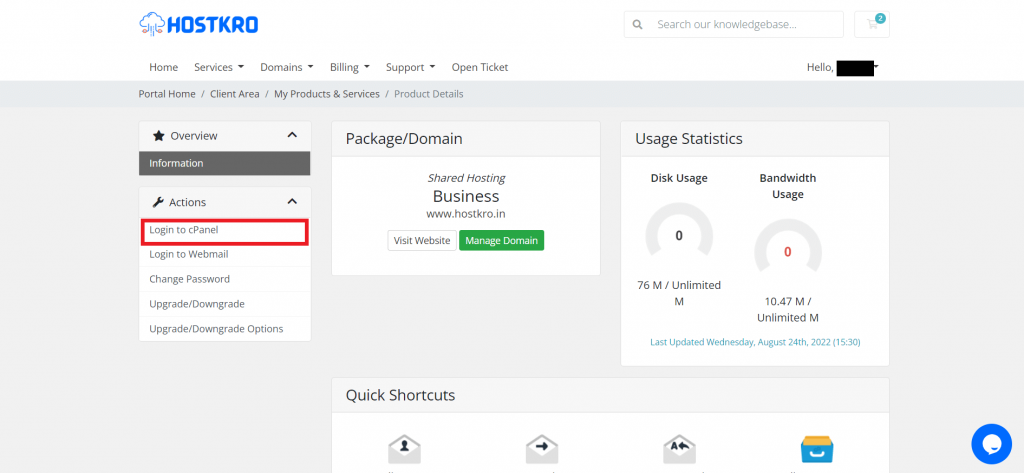
- Now click on login to cPanel
- Here navigate to the software and click on WordPress Manager by Softaculous

- On the first half of this page choose the directory where you want to install WordPress. By default, it shows “wp” in the directory section if you want to install WordPress in the root folder then remove this option and if you want to install WordPress in any folder then enter the folder name here.

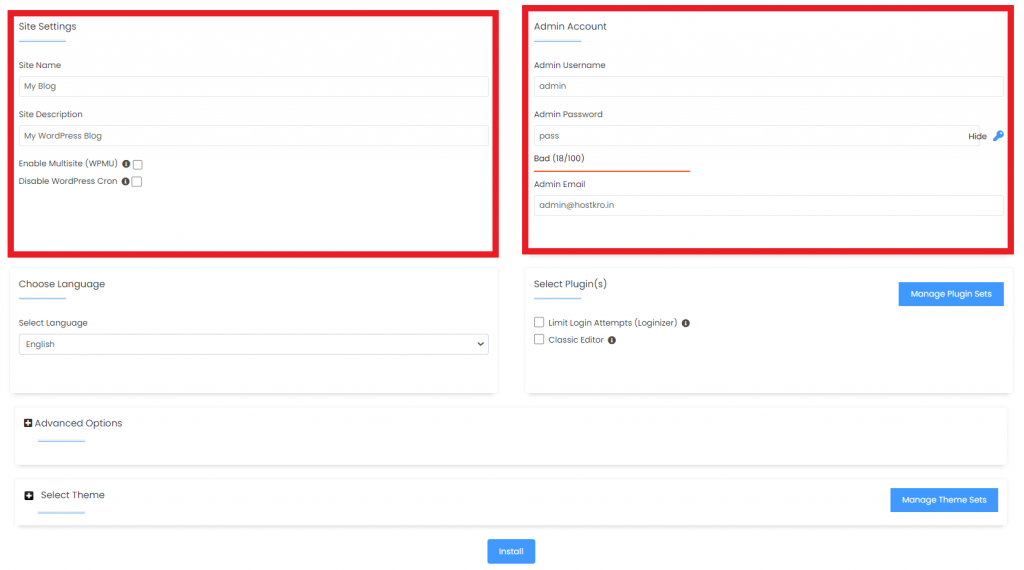
- Now you enter basic site details like site name and description you can change it later too. Also, you need to set a login username and password for your WordPress website after filling in all those details click on the install button.
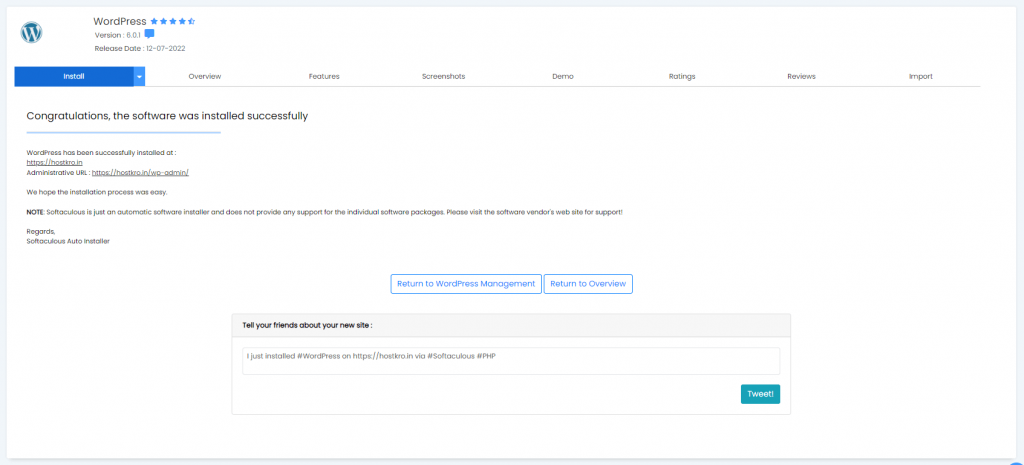
- Boom! WordPress installed successfully on your website.
Step 3: Design your blog
Designing a blog is a time taking process that I can’t cover here in just a few paragraphs even it’s not possible to cover it in a blog post but I will tell to some basics things about designing a blog that you should know and after that, I will share a step by step WordPress blog designing video with you.
The first thing that you need to design your blog is a WordPress theme. Theme plays a very important role in your blog along with blog design it affects your blog speed also so choosing the right theme is important.
Here I am not going to confuse you by giving multiple options of themes. Even though there are thousands of themes available but my personal recommendation is the GeneratePress theme.
GeneratePress is a very lightweight theme that is really good for your blog speed and it is a blank theme so you can design it in the way you want.
It has two variants GeneratePress Free and GeneratePress Premium you can start with the free theme and in the future, if your need more customization options and features then you can upgrade to the GeneratePress premium theme.
Now the theme is final it’s time to install it on your blog to do that follow the below steps.
- Login to your WordPress (To log in to WordPress go to “yourdomain/wp-admin” and enter your login credentials).
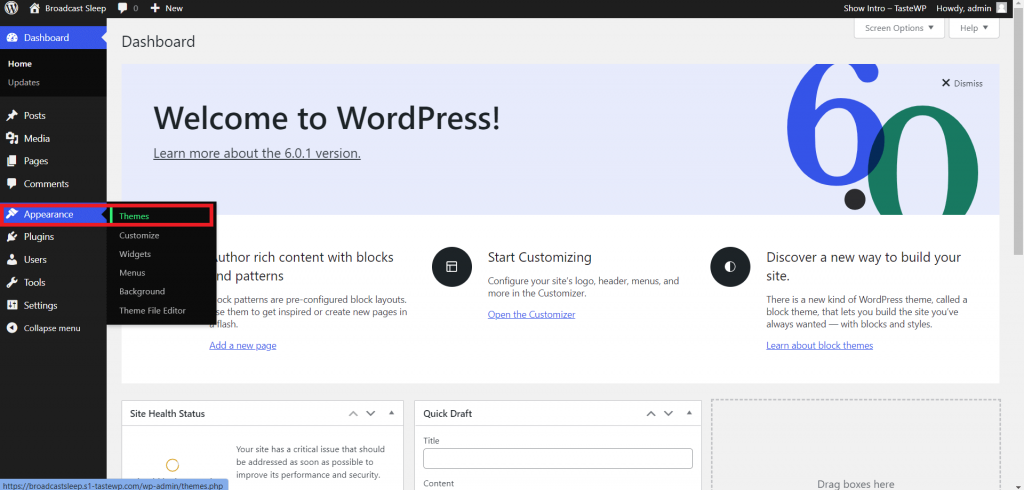
- In the WordPress dashboard navigate to Apperance> Themes and click on add new
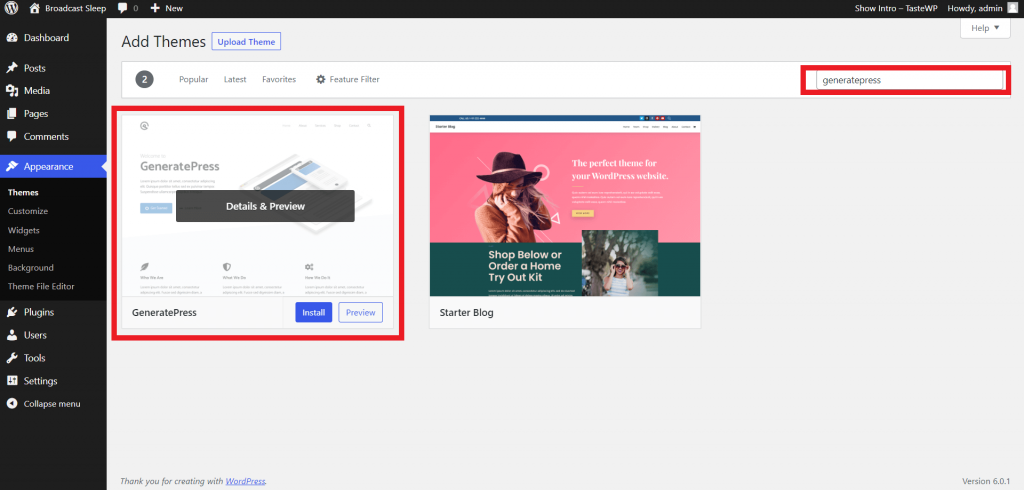
- Now search for GeneratePress here and click on the install button as shown in the below image. After clicking on the install button you will see “activate” butting there just click on that.
- You successfully installed a theme and activated it on your blog.
Now you can design every page of your blog in the way you want and this thing is not possible to share in a blog post so watch the below video to design your blog and after that, you can easily design your blog.
{video}
Step 4: Basic SEO settings need to do on a new blog
SEO stands for search engine optimization in simple words it means optimizing your blog for search engines like Google, Bing, Yahoo, and more.
SEO helps to rank your blog posts at the top of SERP (search engine result page) and by this, you will get organic traffic to your blog it’s really important to build a successful blog.
SEO is also a waste topic but here I will share some basic things your should need to do with your new blog.
1. Set Permalink
Permalink is the URL of your blog posts, and Pages, and there are many formats of permalinks so you need to choose the right structure of permalink for your blog.
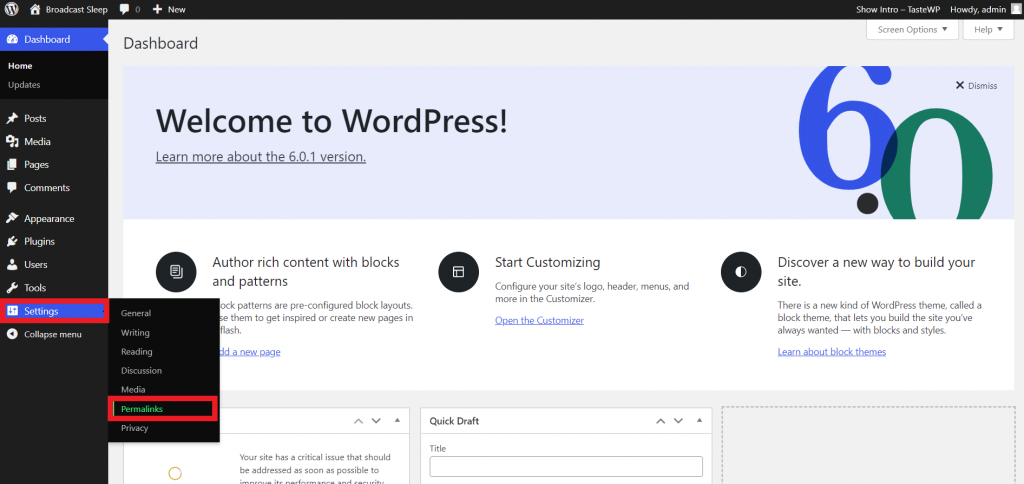
- To set the permalink in your WordPress dashboard navigate to settings> permalink
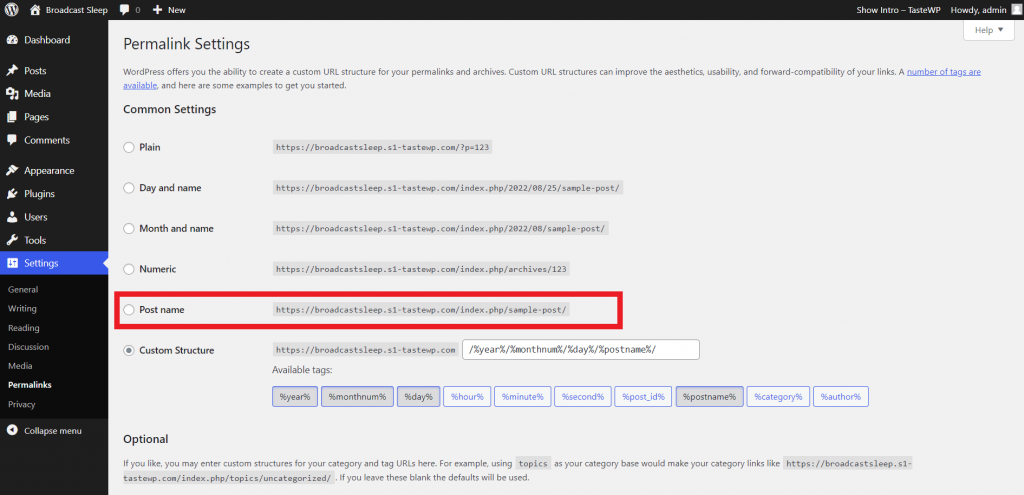
- Here you will see many formats for permalink you need to choose “Post name”
2. Install an SEO Plugin
WordPress SEO Plugin will help you to make your blog posts and pages SEO friendly and it helps to do a lot of time taking tasks in just a few minutes. There are many WordPress plugins but two are the most popular SEO plugins for SEO.
The first is Rank Math and the second is Yoast SEO. I personally use Rank Math but if your want to read the comparison of these popular WordPress SEO plugins then check out Rank Math vs Yoast SEO comparison.
3. Submit blog to Google search console
Your blog is ready but how does Google know this? So to tell Google that your blog is ready for users you need to submit your blog to GSC (Google Search Console).
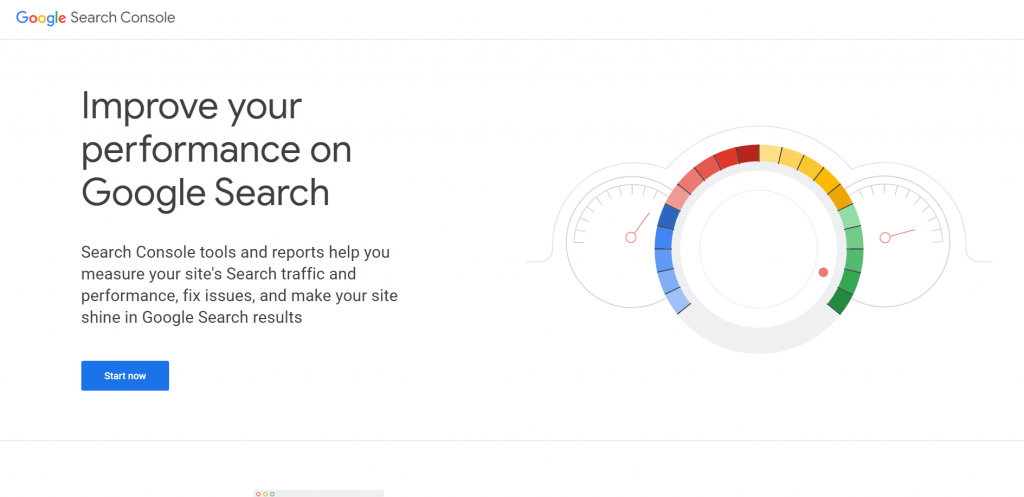
Go to the Google Search Console website and click on the “start now” button then sign in with your Gmail id.
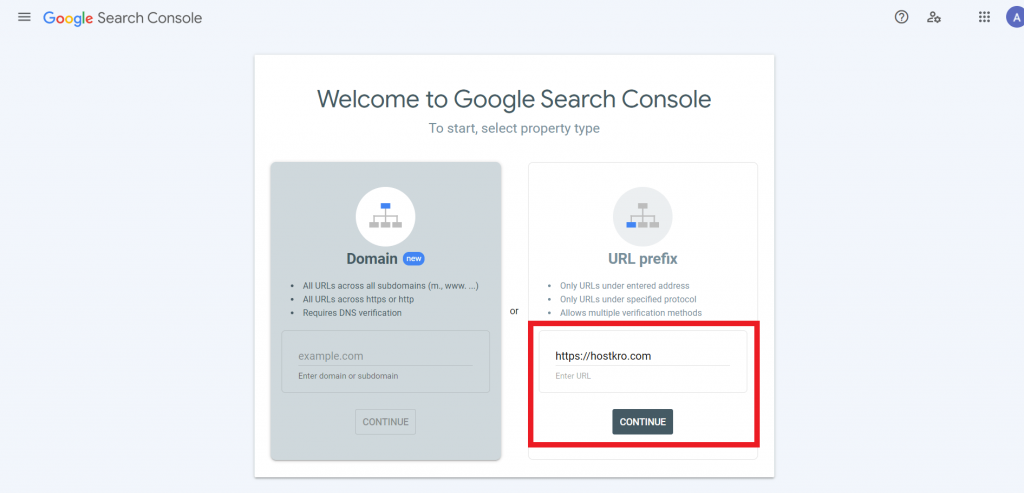
Here enter your domain in the URL Prefix section and click on the continue button
Now you need to verify the ownership of the domain. To do this there are multiple options we are going to do it by using “HTML tag”.
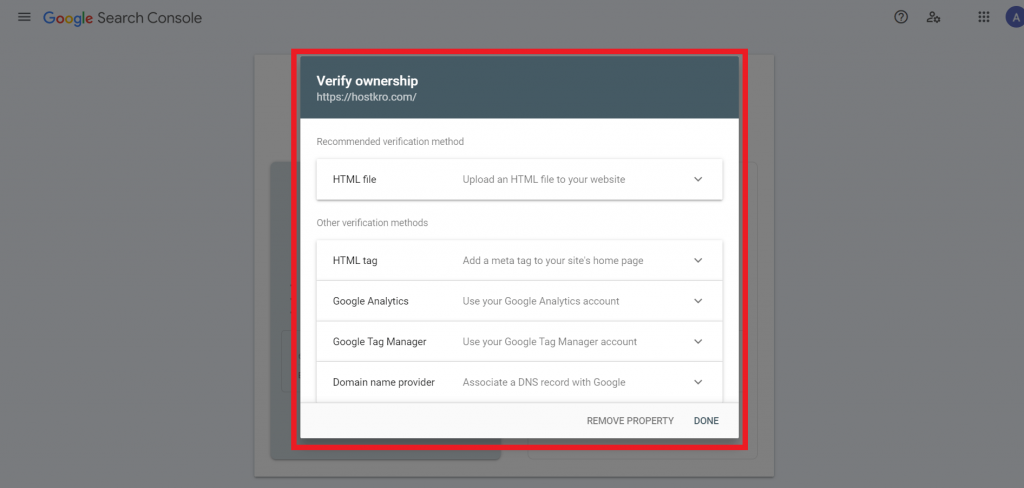
Now copy the HTML tag from here and then we need to paste it on our blog we will do it with the help of the Rank Math SEO plugin which we installed in the above step.
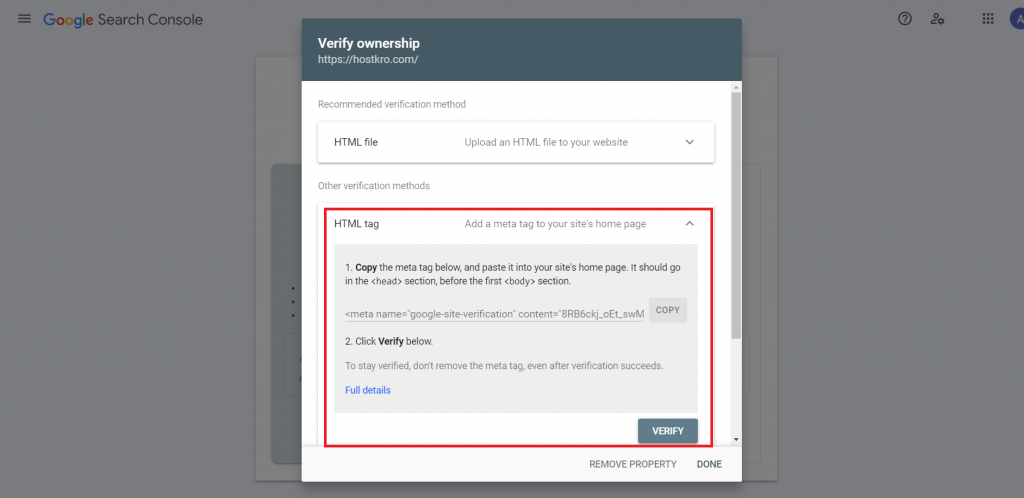
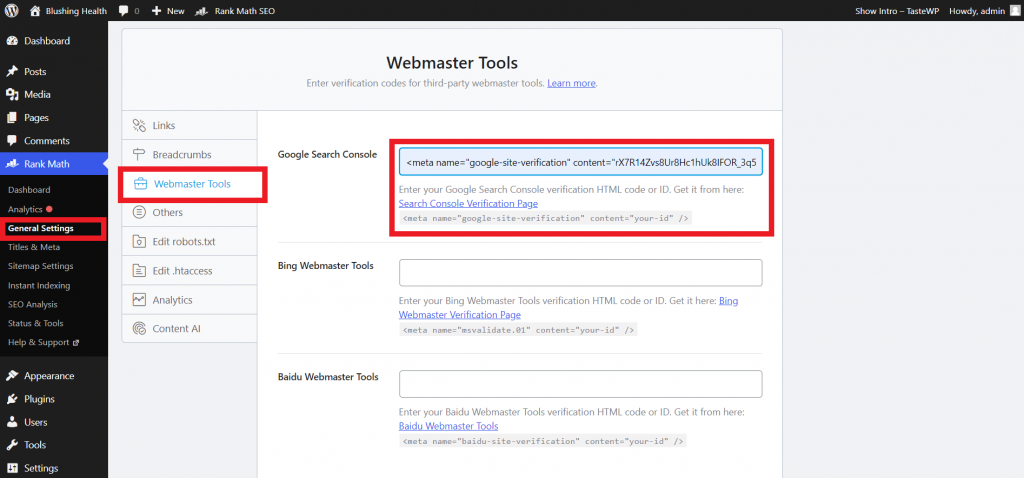
Login to your WordPress dashboard and navigate to Rank Math> General Settings> Webmaster tools and here paste that “HTML tag” then click on the save changes button at the end of this page.
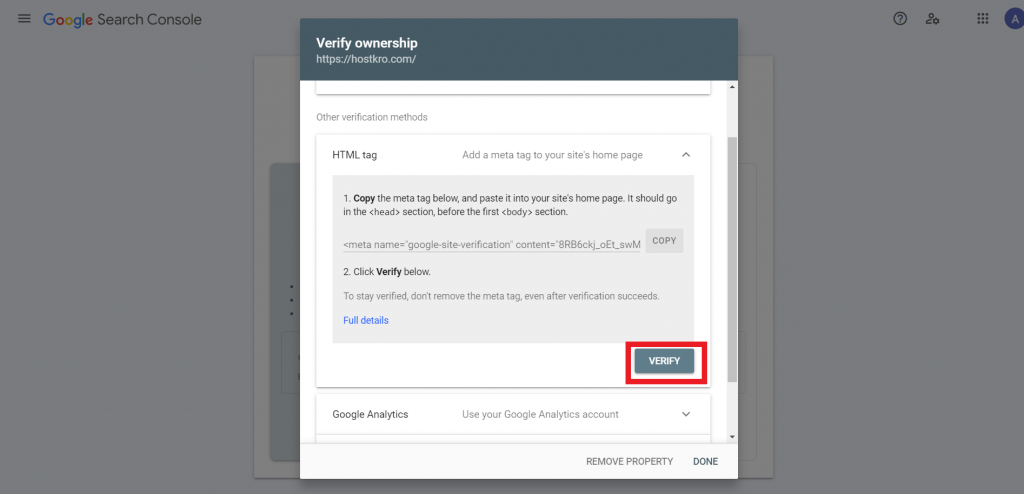
After pasting the HTML tag go back to the Google search console page and click on verify button.
Now your blog is successfully added to Google Search Console the next thing you need to do is submit the sitemap in GSC.
In the Google search console navigate to the sitemaps section and here enter “index_sitemap.xml” and then click on submit button.
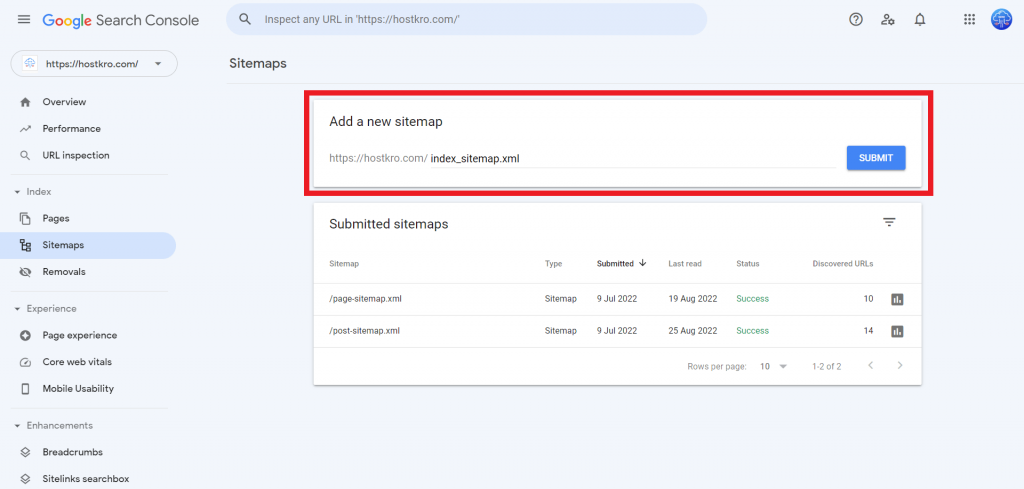
Note:- Your sitemap URL may be different if you are using any other plugin instead of Rank Math SEO.
Step 5: Write and publish your first blog post
Now the main part of a blog is writing content. The end reason for starting a blog is to share content in written format with readers. Let’s see how to do that.
There are two ways to share content with your audience writing blog posts and creating blog pages. Let me quickly describe blog pages and blog posts.
Blog Page: This is the static content that you are not going to update on daily or regular bases. You need to create some important pages for your blog. These are some pages that every blog should have.
- About Page: On this page, you need to describe your blog and yourself so that your readers can connect with you and be more transparent with you.
- Contact: Here you need to mention your contact details so that if readers have any questions or suggestions then they can connect with you.
- Privacy Policy: If you collect data from your visitors in any way, you are required to add a privacy policy page that tells visitors exactly how you are collecting data, how you are using it, and if you are sharing that data. If you implement Google Adsense or a Google Analytics account on your blog, a Privacy Policy must be used. This page is required by the CCPA (California Consumer Privacy Act) and the GDPR (General Data Protection Regulation) and is included by default on your WordPress blog.
- Disclosure: If you are monetizing your blog then this is the must-have a page for your blog you can’t overclock it. On this page, you need to describe the ways you are using to monetize your blog.
Blog Post: This is the dynamic content and the way to share content with your readers. Like this article. Let’s see how to write your first blog post.
How to write a great blog content
Recently google announced their new site-wide update called the “Helpful content” algorithm. You can read in detail about this update by clicking here. But if I describe it in short then this update is all about the quality of content.
Through this update, google wants to serve better results in SERP for the users. So from now, you need to create content that is really helpful for the user otherwise you will be penalized by google and all your site ranking will be lost.
The first thing you need to keep in mind while creating content is to make sure the blog post you are writing is helpful for readers not just for search engines.
Now some important things you need to consider while writing a blog post.
- Your blog post should be informative and add some value to readers.
- Try to create a blog post length of more than 2500 words but don’t stretch it do it if the topic allows.
- Write short paragraphs so that users can’t feel bored while reading it.
- Use Images and videos in the blog post to make it more appealing to the reader.
- Use headings and subheadings to make it easy to understand.
- Now before publishing it checks properly that you write everything properly.
- Also, check if there are any grammatical errors you can do easily by using Grammarly.
These are some quick points you should consider while writing your blog post.
Step 6: Promote your blog
Designing a blog and writing a blog post is just starting off a successful blog. After creating blog posts promoting it is really important to getting visitors to your blog. Especially for new blog promotion is very important to reach an initial audience.
There are a lot of ways to promote your blog and here are some really effective ways to promote your blog.
Share it in your inner circle
After creating your blog and writing the blog post share it with your friends and family and tell them you started an informative blog on a specific topic.
Use Social Media
Nowadays we are all aware of social media and the potential of social media you can reach millions of users through social media. Use Facebook, Twitter, Instagram, quora, and other social media platforms.
Especially if we talk about Facebook then create your Facebook group and promote your blog also keep in mind never to spam anywhere just share your blog in an authentic way.
Comment on other blogs
Comment on other similar niche blogs by doing this you will make good connections with fellow bloggers and also get some visitors to your blog from their comment section.
Collaborate with other bloggers
This is one of the best ways to connect with other bloggers ask them for a guest post and write an informative blog post for their blog and add some of your blog links to that. This will help you to reach their audience and also you will get a chance to connect with other fellow bloggers.
Create an email list
This is my favorite way to promote newly published blog posts. You just need to collect emails from your blog visitor and then you can promote your newly published blog post by mailing them. Also, you can use your email list to promote your paid products if have or planning to create one.
To collect the email of your visitors you can use Sendinblue email marketing and the best thing is you can do it for free.
Step 7: Make money with blogging
This is a really interesting thing especially for beginners every newbie wants to know how to make money with blogging. So here I will share every possible way to monetize your blog.
Monetize blog with ad networks
You can make money by showing ads on your blog and to show ads on your blog you can use ad networks like Adsense, Media.net, Adsterra, A-Ads, and many more.
Selling place for ads
You can also sell specific places on your blog to display paid ads. There are money companies, product sellers, and others who keep looking for blogs to place their ads.
Sell Own Products
You can sell your products like PDFs, Courses, and others on your blog and make passive income through that.
Promote Affiliate Products
You can also generate passive income by promoting affiliate products. In this you need to search for an affiliate product and promote it on your blog by writing content on your blog and whenever any of your visitor purchase that product you will get a commission on every sale.
These are some amazing ways to make money through blogging.
Blogging FAQ
Conclusion – How To Start A Blog
I tried to explain everything in the easiest possible way so I hope now you know how to start a blog but if you still have any questions then ask me in the comment section. Also if you are searching for good web hosting then check out Hostkro’s shared hosting.
Also, don’t forget to share this article with your friends who want to start a blog and want to make a career in bogging.
