Want to know how to Increase The Maximum Upload File Size In WordPress this article will help you. I shared every possible way to increase the maximum upload file size in WordPress.
WordPress is a very popular content management system in the world. It powers almost 50% websites on the internet. While WordPress is known for its flexibility and ease of use, users often run into a common issue when trying to upload large files such as images or videos. By default, WordPress sets a maximum file size limit for uploads, which can be a major hindrance for those looking to share larger files on their website.
In in this article I will share the step by step guide to increase Maximun file upload size limit in the WordPress.
What Is the Maximum Upload Size for WordPress?
Uploading larger files on a WordPress website uses a lot of server resources and to prevent users from causing server timeouts hosting providers set a maximum upload file size. Usually, this size varies between 2MB to 500MB. At HostKro servers, we set it to 2MB but you can increase it any time.
How to Check Your Maximum File Upload Size Limit in WordPress
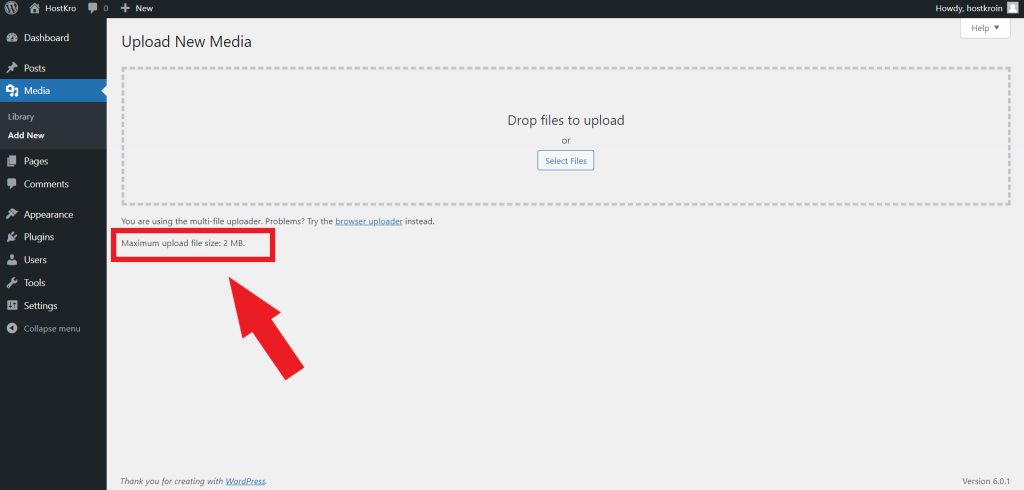
You can easily check your maximum file upload size limit. As I told you at HostKro servers we set this limit to 2MB but if you are using any other hosting service then follow the below steps.
- Login to your WordPress dashboard
- Here go to click on the media option and choose to add new
- On this page, you will the current maximum file upload size limit of your website
How to Increase Maximum Upload File Size in WordPress?
There are many ways to increase the upload file size limit in WordPress and here I will cover all of them one by one. You can use any one method but just for the knowledge, you should know all the methods to increase the maximum upload file size limit in WordPress.
Here are the methods to increase the maximum upload file size in WordPress that we are going to learn one by one.
- Contact Hosting Provider
- Update .htaccess File
- Edit functions.php File
- Edit php.ini File
- Modify wp-config.php File
- Using Plugin Method
1. Contact Your Hosting Provider
This is the easiest way you just need to ask your hosting provider to increase your website’s maximum upload file size limit and they can do it from their side.
At HostKro you will get 24/7 support you can contact us any time. Also, we have multiple options like Whatsapp, Live Chat, Email, and Ticket system to connect our support team to resolve your issue.

2. Update .htaccess file
If your web server is using Apache and PHP is set as an Apache module, then you can add a few lines of code in your WordPress .htaccess file to increase the max upload size in WordPress.
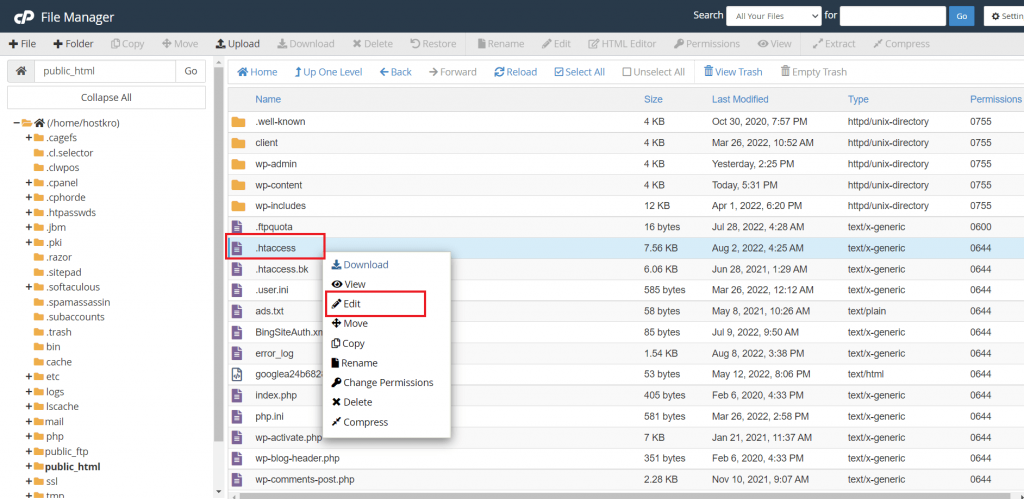
To access the .htaccess file login into your cPanel and navigate to the file manager in the root folder (public_html) where you installed the WordPress you will find this file called .htaccess. Now just right-click on the file can choose the edit option.
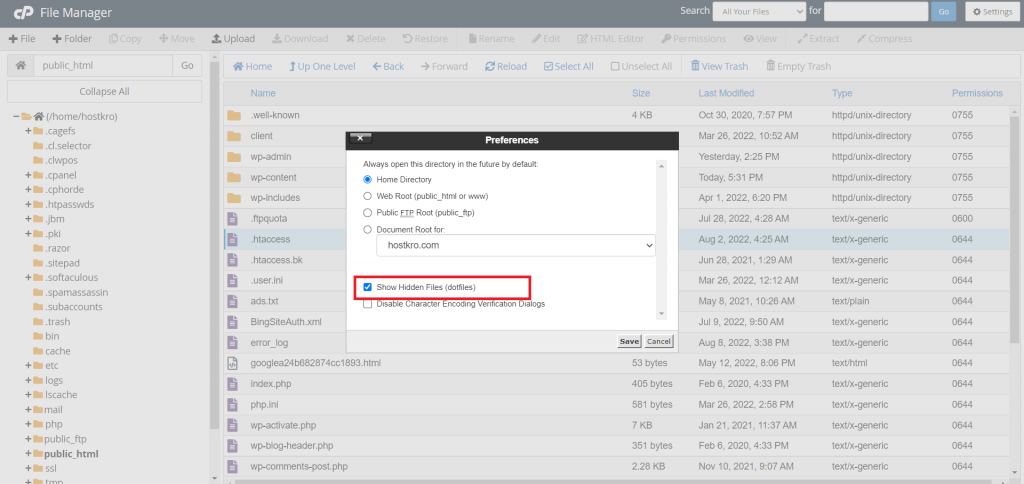
In case you didn’t see this file in the root folder then click on the settings option and then tick the show hidden files then click on the save button.
So once you click on the edit option here you just need to write the code given below at the end of the page.
php_value upload_max_filesize 64M
php_value post_max_size 128M
php_value memory_limit 256M
php_value max_execution_time 300
php_value max_input_time 300
This will define the max upload size in Megabytes. Replace the numbers as per your requirement. The max execution time and max input time are in seconds. The execution time defines the limit of time spent on a single script. Choose a number that is suitable for your site.
3. Edit functions.php File
Sometimes you may don’t have access to your cPanel or if you are more comfortable with editing theme files then here is the method for you.
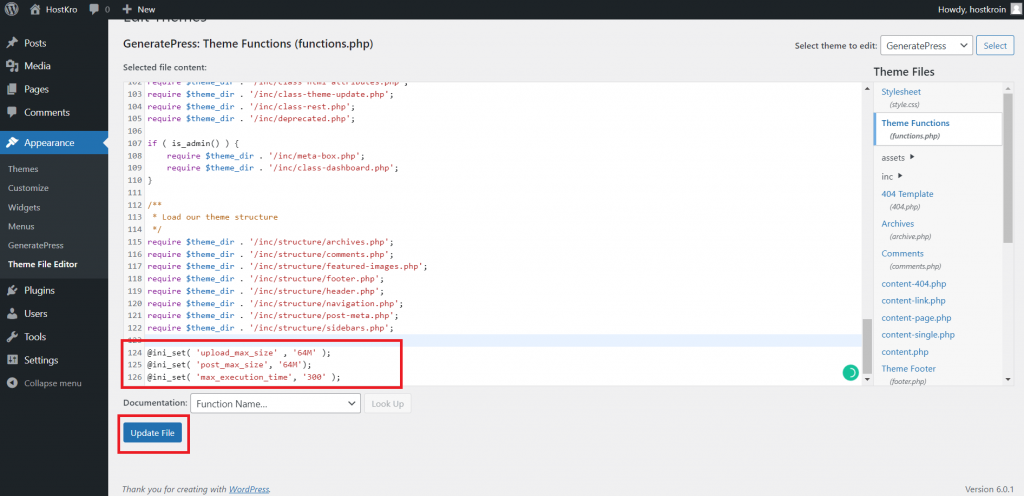
You can easily increase the size limits by adding the following lines of code in the functions.php file of your theme.
However, remember if you change the theme, the max upload size will return to its default values until you edit the functions.php file of the new theme.
@ini_set( 'upload_max_size' , '64M' );
@ini_set( 'post_max_size', '64M');
@ini_set( 'max_execution_time', '300' );
If you don’t know how to edit the theme files in WordPress then just follow the below steps.
Login into your WordPress dashboard go to the appearance section and choose theme file editor here.
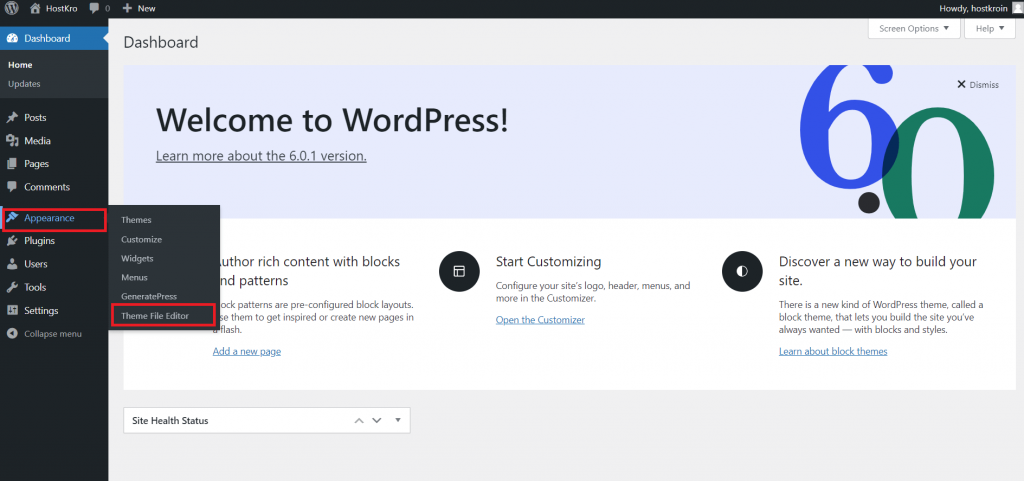
Now on the right side of your screen, you will see the name of files available in your theme. Choose the file which you want to edit.
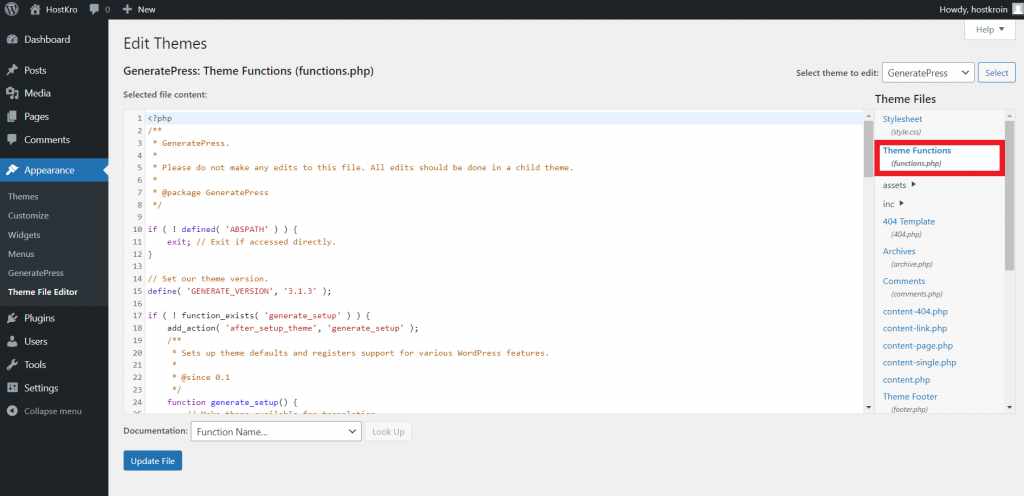
Once you choose the file write the code you want and click on the update button.
4. Edit php.ini File
This is a default file used to configure any application which runs on PHP. This file contains parameters required for file timeout, upload size, and resource limits. This file is available in the root folder of your website. In some cases, this file is not visible; the other option would be to create a new file instead.
Open any text editor and create a new file on your desktop. Copy the following code and save it as php.ini.
upload_max_filesize = 64M
post_max_size = 128M
memory_limit = 264M
If you create a new PHP.ini file, then upload it inside the same root folder.
5. Modify wp-config.php File
Another way of increasing the upload size in WordPress is to define the size parameter in the wp-config.php file. To do that, access your WordPress root directory and locate a wp-config.php file.
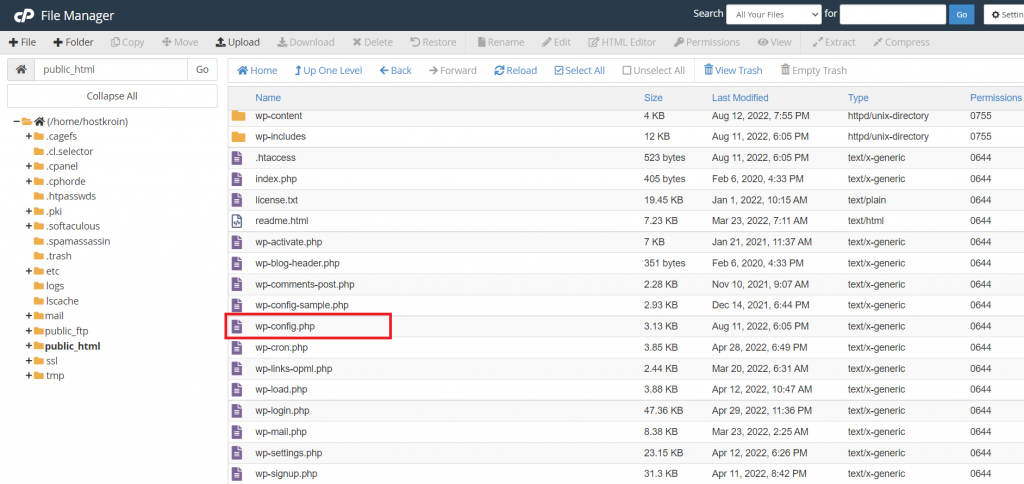
Right-click on the file and click on the edit option and add the below code to the file.
@ini_set( 'upload_max_size' , '20M' );
@ini_set( 'post_max_size', '13M');
@ini_set( 'memory_limit', '15M' );
Save your changes, and it should increase your file upload size.
6. Using Plugin Method
Not everyone wants to write code or access different files in the root folder. For that situation, the plugin comes in handy, and luckily there is a WordPress plugin available for increasing WordPress upload size. The plugin we will be using is the Increase Max Upload Filesize plugin.
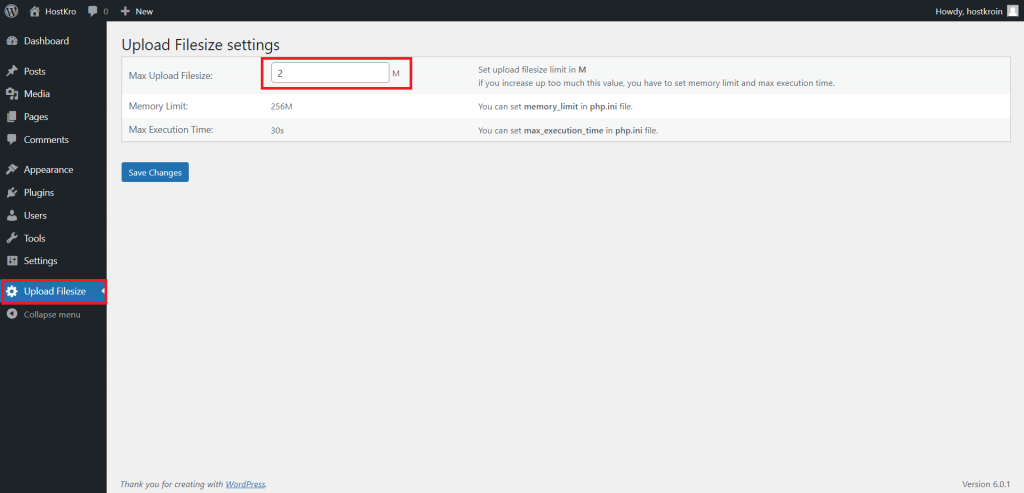
- Go to your WordPress Dashboard → Plugins → Add new, search “Increase Max Upload Filesize”, then Install and Activate the plugin.
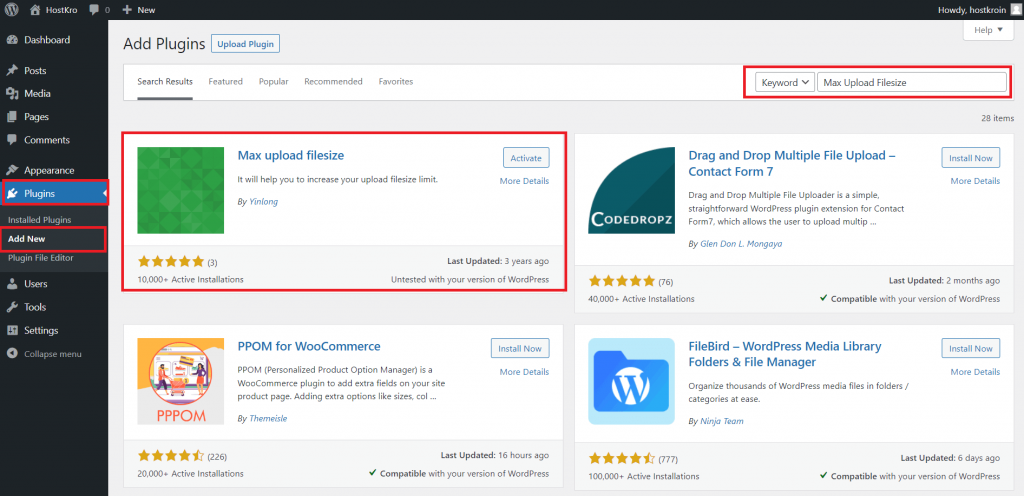
- Once installed, go to plugin settings and simply enter the value for upload size and Click the Save Changes button to apply the new upload size.
Frequently Asked Questions
What is the maximum upload size for WordPress?
In most of the hosting services, the maximum upload size for WordPress is set between 2MB to 128MB but you can increase or decrease it according to your use. At Hostkro we set this limit to 2MB.
How do I increase the maximum upload file size in WordPress?
There are six different methods to increase the maximum upload file size in WordPress.u003cbru003e1. Content your hosting provideru003cbru003e2. Update .htaccess Fileu003cbru003e3. Edit functions.php Fileu003cbru003e4. Edit php.ini Fileu003cbru003e5. Modify wp-config.php Fileu003cbru003e6. Using Plugin Method
Conclusion
In this article, I shared every possible way to increase the maximum upload file size limit. However, some methods may not work on a few web hosts. If in case, the above methods do not work with you, the best thing to do is contact your hosting provider. Another option is simply to reduce the size or change the type of the original file.
If you still have any queries about increasing the upload file size limit in WordPress just put that in the comment section.